How to Change Style
Style Kinds
There are three kinds of style, which can be set to the element:
- Default style - a style defined by the current style set and its rules.
- Style by class - a named style, which can be shared and used by multiple elements. It has to be set manually.
- Custom style - a completely independent style defined only for a single element.
Style Tab in Properties Dialog
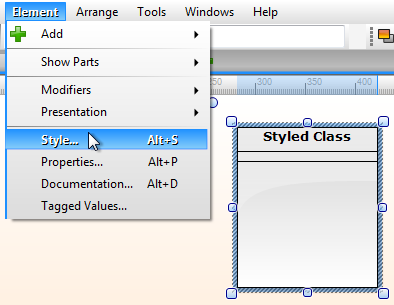
If you want to set the style of a selected element, you can do it using Style tab in Properties dialog. If you want to open directly the Style tab, you can do it using menu Element / Style.
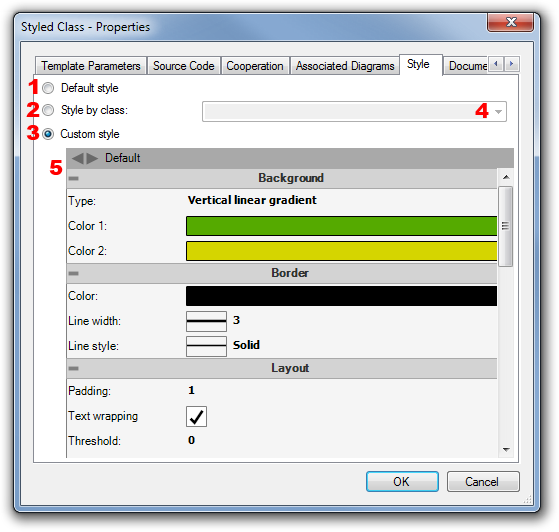
Style tab in the Properties dialog allows you to change the kind of style to Default style (1), Style by class (2) or Custom style (3). If you choose Style by class, you have to choose the defined style from the drop down list (4). The style set has to contain such styles, otherwise the list will be empty.
If you choose the Custom style option, you can define a custom style in the style editor (5). You can adjust many styling options.
Style Section in Context Bar
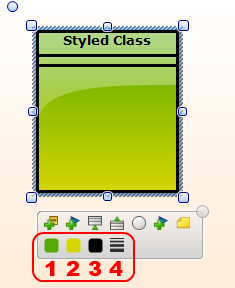
Context bar offers some basic style options, which can be changed for one or more selected elements in a diagram. There are several buttons:
- Change Background Color
- Change Second Background Color
- Change Border Color
- Change Border Width
If you edit an element with a default style or a class style, it will be automatically converted to a custom style. So the changes from context bar never affects the other elements.
Style Sidebar
There is also a Style sidebar which allows you to easily set the custom style for the selected element without opening the Properties dialog.
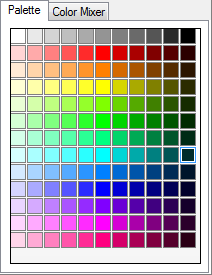
Choosing Color
A color for border, background, text or anything else can be chosen in two ways - from the palette or using the color mixer. You can pick the color you want from the palette of 143 pre-defined colors. If you need a specific color, you can use the color mixer, which allows you to choose your custom color from 16777216 colors. It allows you also to define the transparency of the color.
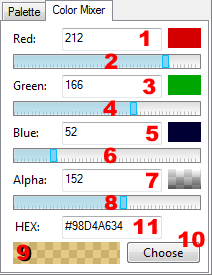
You can find the color mixer on Color Mixer tab in the color drop down menu. You can type an exact value of red (1), green (3) and blue (5) component of the color to particular text boxes or you can set them using track bars for red (2), green (4) and blue (6). The alpha component of color allows you to set the transparency of the color. Zero is for a completely transparent color, 255 is for the opaque color. You can set the transparency using the track bar (8) or you can type a numeric value (0-255) to the text box (7).
You can see the hexadecimal code of your color in the last text box (11). Also the live preview of the result color is available in the bottom box (9). You can confirm and set your mixed color using the Confirm button (10).
fr016 2 March 2019 17:46:49