Filter in Diagrams
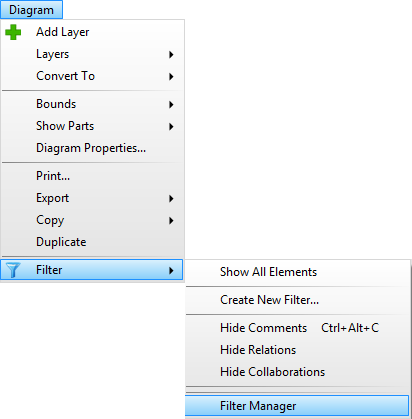
The menu for working with filters is Diagram/Filter. It offers the following options:
- Show All Elements - removes the applied filter (if any). All diagram elements will be shown.
- Create New Filter - shows a dialog that allows you to create a new custom filter and apply it to the diagram. You can create a global or project filter - read more in the Filter Definition chapter.
- Hide Comments - applies the filter to the active diagram, which hides all comments also with its connector lines.
- Hide Relations - applies the filter to the active diagram, which hides all relations of all types.
- Hide Collaborations - applies the filter to the active diagram, which hides the collaboration elements.
- (List of global filters) - lists all globally (project-independent) defined filters. You can apply the filter to the diagram by clicking on the filter item.
- (List of project filters) - lists all filters defined in the current project. You can apply the filter to the diagram by clicking on the filter item.
- Filter Manager - shows the Filter Manager window, which allows you to create, edit and delete filters.
Filter Manager
Filter Manager shows all global filters (saved in the user profile) and all filters defined in the current project. It allows you to add, duplicate, edit, delete, import, and export filters. The window of Filter Manager consists of a toolbar and a list of all filters. The type of filter is listed in parentheses - there are two available types: Project and Global filter.
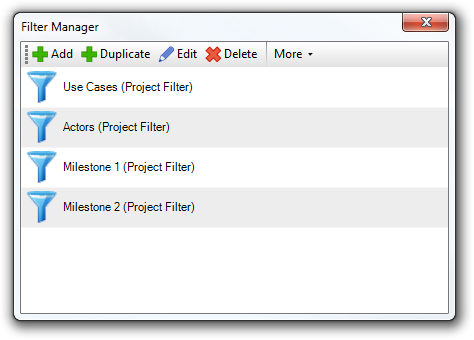
- Add () - adds a new filter, which you define in the Filter Definition window.
- Duplicate () - adds a new filter based on the filter selected in the list of filters. It shows the Filter Definition window where you can adjust the filter.
- Edit () - opens the selected filter in the Filter Definition window, where you can adjust the settings and conditions of the filter.
- Delete () - deletes the selected filter from the project (Project filter) or the user profile (Global filter).
- More - shows the menu with other options:
- Import - imports a new filter from the file on disk.
- Export - exports the selected filter to the file.
Filter Definition
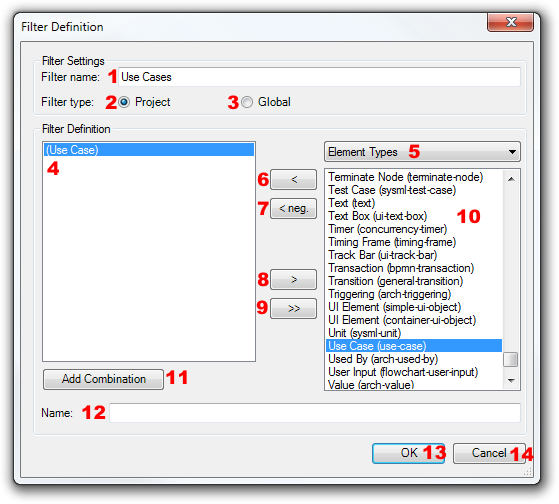
When you create a new filter, you have to define its name (1) and type - Project (2) or Global (3).
Filter can be one of two types - Project and Global. The project filter is saved in the project file and can be used only in the project where it is defined. The global filter is saved in an independent file and can be used later in any project.
Filter definition consists of a list of disjunctive conditions/subfilters (4). If any of these conditions are fulfilled for an element, the element will be shown after applying the filter. There are 4 basic types of simple filters, which can be easily added to the list of conditions:
- Element Types - simple filters, which can filter elements by their type
- Stereotypes - simple filters, which can filter elements by their stereotype
- Collaborations - simple filters, which can filter elements by collaboration which are connected with
- Persons - simple filters, which can filter elements by their creator
You can select the type of simple filters from the drop-down list (5). Simple filters will be shown in the list below (10). Just click on simple filter name in the list (10) and add it using Add (<) button (6) or using Add negative(< neg.) button (7). Add button adds a positive condition and Add negative button adds a negative condition. For example, if you choose Element Types / Use Case simple filter and add it using Add button, only use cases will be shown after applying the filter. If you add the same simple filter using Add negative button, all elements except for use cases will be shown.
If you want to add some combination to the list of conditions (e.g. Actor with <<system>> stereotype), use Add Combination button (11).
You can remove the selected condition from list of conditions using Remove (>) button (8). If you want clear the whole list of conditions, use Clear (>>) button (9).
You can filter elements also by their names - type a text which should be part of the element name in the Name text box (12).
If your filter is completed you can save it using the OK button (13). If you want to close the window and discard all changes you made, click on the Cancel button (14).
Add Filter Combination
You don't need to use only simple subfilters in the list of conditions, but also the combinations. If you click on the Add Combination button (11), Add Combination dialog will show. You can define, what the element has to fulfill to be displayed after applying the filter. All these parameters have to be fulfilled at the same time.
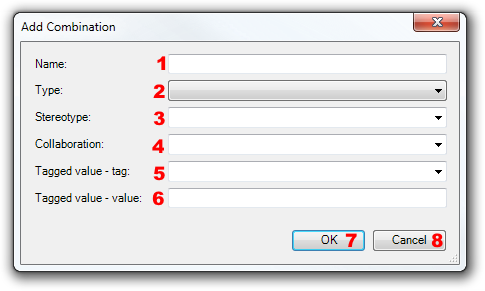
You can set any combination of these parameters:
- Name (1) - part of the name which has to be matched
- Type (2) - type of the element
- Stereotype (3) - stereotype, which has to present among the stereotypes of the element
- Collaboration (4) - name of collaboration, which has to connected with the element
- Tagged values - tag (5) - tag, which has to be defined for the element
- Tagged values - value (6) - value, which has to be set for the tag defined in 'Tagged values - tag' or for any tag, if 'Tagged values - tag' field is empty
Filter combination will be added to the list of conditions after clicking the OK button (7), or it will be discarded, if you use the Cancel button (8).
You can add any number of combinations and simple filters to the list of conditions.
fr016 2 March 2019 17:45:05
Filters