Project Tree Sidebar
There are several methods to access the Project Tree sidebar:
- By clicking the "Project" button in the sidebar header bar.
- Via the ribbon: View → Windows → Sidebars → Project Tree.
- Via the classic menu: View → Sidebars → Project Tree.
- By typing 'Project Tree' into the quick action box.
The sidebar is composed of two toolbars and a project tree view.
Project Tree View
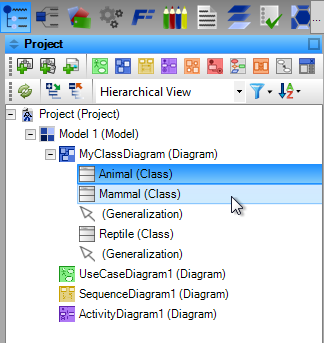
The project tree view, occupying the majority of the sidebar, displays folders, diagrams, and elements from the current project. Clicking on an element selects it (clearing previous selections unless CTRL is held), opens its parent diagram, and navigates to the element. Clicking on a diagram opens a tab with the diagram editor, while clicking on a folder opens a Folder Overview tab. Selecting the project node reveals the Project Properties tab.
Multiple items can be selected simultaneously by holding the CTRL key while clicking. Holding the SHIFT key selects all items between two clicks. Items can also be deselected by clicking them with the CTRL key pressed.
To rename an item, click and press F2 or double-click and wait for an edit box to appear.
Items, including folders, diagrams, and elements, can be rearranged by dragging them to new positions within the tree. This allows for reorganization of elements, diagrams, and folders within the project hierarchy.
Toolbar Buttons
New Diagram
This button opens the New Diagram dialog for creating a new diagram within the active folder, based on the chosen type and name.
New Folder
This function adds a new project folder to the project. When the Project node is selected in the project tree, it creates a top-level folder. If a folder is currently selected, the new addition becomes a subfolder of this existing folder. Similarly, if a diagram or element is selected, the new folder is placed as a subfolder of the parent folder of the selected diagram or element.
New Resource Item
Opens the Add Resource Item dialog for adding new resources to the project. Resources are added to the active folder upon confirmation.
New Glossary
Initiates a new partial glossary in the active folder, providing an editor for glossary terms and definitions.
Favorite Diagrams
The right section of the top toolbar in the Project Tree sidebar features buttons that enable the addition of new diagrams with a single click. Up to 10 buttons are available, representing the top 10 most frequently used diagrams. This design facilitates easier and quicker creation of your favorite diagrams compared to others.
Refresh
Updates the project tree to reflect the most current data.
Expand All
This function expands all nodes and subnodes in the project tree, making the entire tree fully visible with all its components.
Collapse All
This option collapses all nodes and subnodes in the project tree, leaving only the top-level Project node visible.
View
The "View" drop-down menu enables users to alter the structure of content displayed in the project tree, offering various organizational perspectives:
- Hierarchical View: This view presents the project tree in a logical hierarchy, showcasing the arrangement of folders, diagrams, and elements in their respective order.
- Hierarchical Model View: This view organizes the content based on model ownership, rather than presentation. It differs from the Hierarchical View by displaying elements that are not placed on any diagrams, offering a deeper insight into the model's structure.
- Versioned Hierarchical Model View: Similar to the Hierarchical Model View, this option goes a step further by also showing all versions of the model included in the project. It provides a comprehensive view of the model's evolution and variations within the project.
- All Entities: This option displays all project elements in a straightforward list format. Notably, it excludes the presentation of diagrams and folders, focusing solely on individual project elements.
- Diagram Types: In this view, only diagrams are displayed, grouped categorically by their type. This allows for a focused overview of diagrams based on their classification.
Filter
The "Filter" drop-down button in the Project Tree sidebar allows users to tailor the display of items in the project tree by offering both 'Show' and 'Hide' perspectives. This feature enhances the user's ability to manage the visibility of various project components. The options include:
- Show Entities: Checking this option displays all entities (such as classes, actors, states, etc.). Conversely, unchecking it hides these entities from view. This is useful when you want to declutter the project tree and focus on other aspects like relationships or specific groups.
- Show Relations: When checked, all relationships (like generalizations, associations, etc.) are shown. Unchecking this option hides these relationships, which can be helpful when the focus is needed on individual entities or when simplifying the project view to reduce complexity.
- Show Groups: If enabled, this setting displays all groups present in the project. Groups might encompass categorized entities or other logically grouped items, aiding in organized project navigation.
- Show Comments: Checking this box shows all comments within the project. Unchecking it hides them, which is particularly useful when you need a cleaner view of the project tree, free from annotations or notes, allowing for a more streamlined focus on the structural elements of the project.
The ability to hide certain elements by unchecking these options is crucial in scenarios where a more focused or simplified view of the project is necessary. It enables users to minimize distractions and concentrate on specific areas of the project, enhancing both the efficiency and effectiveness of their navigation and management of the project content.
Sorting
The "Sorting" feature in the Project Tree sidebar provides a versatile approach to organizing project tree items according to various criteria. This functionality enhances the user's ability to efficiently navigate and manage the project structure. The sorting options include:
- Custom Sort: This option enables a user-defined order of items. Users can arrange the items in a sequence that best suits their workflow or project requirements, offering a personalized view of the project tree.
- Sort By Name: Selecting this criterion organizes items in the project tree alphabetically by their names, in ascending order. This is particularly useful for quickly locating specific items when the user is familiar with their names.
- Sort By Creation Date: This option sorts items based on their creation dates, with the earliest created items appearing first. It’s beneficial for tracking the chronological development of the project or for focusing on the most recently added elements.
- Sort By Type: When chosen, this sorts items according to their type, in ascending order. This sorting method is useful for users who want to view similar items collectively, such as placing all classes, packages or enumerations together.
Select Active Diagram
This option automatically highlights the node in the project tree that corresponds to the currently active diagram. It is particularly useful when an element within the tree is selected, as it allows for quick and easy navigation to the parent diagram of that element.
Select Active Folder
This feature focuses on the node in the project tree that aligns with the currently active project folder. It's especially helpful when either an element or a diagram is selected in the tree, enabling users to swiftly navigate to the parent folder of the selected item. This functionality streamlines the process of locating and organizing related project components within their respective folders.
Context Menu
Right-clicking on an item in the project tree activates the context menu, offering a variety of commands to manage and modify project components:
Add Folder
This command creates a new folder within the project. If the project node is selected, it adds a top-level folder. Otherwise, it adds a nested folder within the currently active folder.
Add Diagram
Reveals a submenu listing all available diagram types, allowing you to add a new diagram directly to the active folder.
Add Other
This option facilitates the addition of various project items, such as:
- Documents
- Resource Items
- Presentations
- Mapping Definitions
- Glossaries
Add Nested Diagram
Enables the addition of a new nested diagram to a selected diagram element. This newly added diagram is not placed directly under any folder but is nested within the selected diagram element.
Associate New Diagram
Associates a newly created diagram with the selected diagram element. The new diagram is added to the parent folder of the element and linked to it, enhancing the relational context within the project.
Associate Existing Diagram
Links an existing diagram from the project to the selected diagram element. This is useful for creating meaningful connections between elements and diagrams that elaborate on their details.
Move To Folder
This command allows the relocation of a selected diagram to a different project folder, aiding in the reorganization of project components.
Rename
Initiates the renaming process for an item, making it simple to update names and labels as the project evolves.
Copy
Copies the selected item(s) to the clipboard, enabling easy duplication or relocation within the project.
Paste
Pastes items from the clipboard into the project tree, facilitating the addition of previously copied elements.
Duplicate
Creates an independent copy of the selected item, adding it to the project tree at the same hierarchical level as the original.
Delete
This option removes the selected diagram element(s) only from the current diagram, while the underlying model is preserved in the project repository and other diagrams (if it was placed there). This allows for the possibility of adding these items to another diagram at a later stage, ensuring flexibility in project management and design.
Delete from Project
Completely removes the selected element(s) from the project. If multiple instances of the diagram element exist, a dialog will appear, listing these instances and allowing you to decide whether to delete all of them.
Properties
Displays a properties dialog for elements, diagrams, and folders. For the root project node, it opens a Properties tab, providing detailed information and settings for project components.
New Comment